Online Help for UCC1, UCC3 and Franchise Tax
UCC1 User Manual
Instructions are available on most pages in this site. For an overview of a page, an explanation of a particular field or button on that page, click on 'Help' for detail.
User Guide Topics
Login
Information
|
|
|
|
|
The Login is required before proceeding. If you are a new user, click the click here link.
Click Here - Click here will take you to a new page to enter information for creating a new account. You must set up a login and password at that time.
Filer
Information
Fill
in all required fields and click the Continue button.
|
|
|
|
|
UCC Type
Type of UCC filing - Select the type of UCC from the drop down box.
Real Estate Records - Select YES or NO
Type of Filing – select a type of filing from this drop down list.
Continue - Click this button to save the information entered and proceed with the filing.
![]()
Debtor
Information
|
|
|
|
|
|
|
|
The Debtor is part of the UCC1 filing process and at least one is required. Debtors can be an Organization or Individual, type the name in the appropriate field and their address.
Organization Debtor - Organization means an entity having legal identity
separate from its owner. A partnership is an organization; a sole
proprietorship is not an organization, even if it does business under a trade
name. If Debtor is a partnership, enter exact full legal name of partnership;
you need not enter names of partners as additional Debtors. If Debtor is a
registered organization (e.g., corporation, limited partnership, limited
liability company), it is advisable to examine Debtor's current filed charter
documents to determine Debtor's correct name, organization type, and
jurisdiction of organization.
Individual Debtor - Individual means a natural person; this includes a sole
proprietorship, whether or not operating under a trade name. Don't use prefixes
(Mr., Mrs., Ms.). Use suffix box only for titles of
lineage (Jr., Sr., III) and not for other suffixes or
titles (e.g., M.D.). Use married woman's personal name (Mary Smith, not Mrs.
John Smith). Enter individual Debtor's family name (surname) in Last Name box,
first given name in First Name box, and all additional given names in Middle
Name box.
For both organization and individual Debtors: Don't use Debtor's trade name,
DBA, AKA, FKA, Division name, etc in place of or combined with Debtor's legal
name; you may add such other names as additional Debtors if you wish (but this
is neither required nor recommended).
Multiple Debtors - If additional Debtors need to be entered, save the first
entry, a new screen will be presented, enter information for next Debtor and
SAVE. Continue this process until all Debtor information has been entered and
saved then click Continue.
Address - An address is always required for the Debtor named.
Type of Organization, Jurisdiction State - "Additional information re
organization Debtor" is always required. Type of organization and
jurisdiction or organization as well as Debtor's exact legal name can be
determined from Debtor's current filed charter document. Capacity, Trust, Trust
Date - If Debtor is a trust or a trustee acting with respect to property held
in trust, enter Debtor's name and select appropriate item in drop down box for
capacity, then select TRUST if applicable and key in date of Trust if
applicable. The format must be mm/dd/yyyy.
Authorized Party Type - This field identifies the party authorizing the filing
of this financing statement.
Save - The Save button stores the information currently in the fields and returns the next screen to be completed.
Continue – The Continue button moves the user to the next screen once all of the debtors have been saved (in this case the next screen is the Secured Party screen).
Cancel – The Cancel button removes any unsaved entered data and refreshes the screen.
Add New – The Add New removes any unsaved entered data and refreshes the screen.
First, Previous, Next, Last – These buttons help users move between debtors in the added grid if more than one debtor is added for the purposes of viewing or editing a debtor.
![]()
Secured Party Information
|
|
|
|
|
|
|
|
A minimum of 1 Secured Party or Total Assignee is required by code. If you are entering multiple secured parties, key the first set of information and click SAVE. A new screen will be presented for next set of secured party information, key data and click SAVE. Continue this process until all secured parties have been entered and SAVED then click Continue.
Secured Party - If there has been a total assignment of the Secured Party's
interest prior to filing this form, you may enter Assignor S/P's name in this field.If the Assignor's name is entered, also use
Assignor's address in address field. Trust - This is an optional field. If the
secured party name entered is an organization and that organization is a Trust,
indicate so here.
Trust Date - If Trust is designated in prior field, key in the date of the
Trust if known or applicable. The date format must be mm/dd/yyyy.
Save - The Save button stores the information currently in the fields.
Continue – Moves the user to the next screen (such as the Collateral screen once all debtors and secured parties have been added).
Cancel – The Cancel button removes any unsaved entered data and refreshes the screen.
Add New – The Add New removes any unsaved entered data and refreshes the screen.
First, Previous, Next, Last – These buttons help users move between secured parties in the added grid if more than one debtor is added for the purposes of viewing or editing a debtor.
![]()
Collateral Description
|
|
|
|
|
|
|
|
Collateral Description - Maximum capacity for collateral text is 24,000 characters.
Continue – saves the entered data and moves to the next screen.
Real Estate Description
|
|
|
|
|
|
|
|
Coverage - Indicate what type of Real Estate is being covered from the drop
down list on screen.
Record Owner Name - Enter the name and address of the Owner of Record for
described real estate.
Description - Maximum capacity for real estate description is 24,000
characters.
Continue – saves the entered data and moves to
the next screen.
Review
|
|
|
|
|
|
|
|
You may review all previously keyed information by clicking on the tabs to the left of the page. This will allow you to modify any information already saved for this filing. If you review any or all pages at this time, you may click on final submit from that page. If you are satisfied with all the information saved, click SUBMIT now.
Additional Information - Under certain circumstances, additional information not provided on Financing Statement may be required. Also, some states have non-uniform requirements. Use this space to provide such additional information or to comply with such requirements; otherwise, leave blank.
Continue – saves the entered data and moves to the next screen.
Miscellaneous
This Information will refer Box 10 of the UCC1 addendum and in case of UCC3 it will be refer Box 18 of UCC3 Addendum
Payment Information
Fill in all required fields based on the payment type you select from the Payment Type drop down list.
Credit Card Payment
|
|
|
|
|
State - This is required unless the address is outside the United States, if this is the case, leave blank.
Submit- The Submit button stores the information currently in the fields and
moves the user to the last screen.
Routing
Number
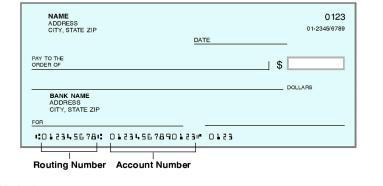
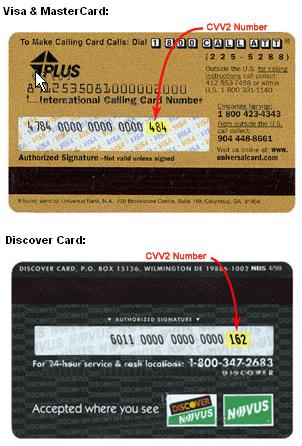
Card
Verification Value or CVV Number
Card Verification Value (also known as Customer Card ID Number or CID or CVV or CVV2), is a number that is printed, not imprinted, on your Visa, Mastercard, or Discover card. This number is never transferred during card swipes and should only be known by the cardholder, the person holding the card in their hand. The CVV three-digit value is printed on the signature panel on the back of Visa, Mastercard, or Discover cards immediately following the card account number. Please see the picture below for reference.
Acknowledgement
Message
|
|
|
|
|
|
|
|
UCC1 File Number - This is the unique file number assigned by the UCC
database.
Submission Date and Time - This is the actual file date and time this financing
statement was processed and assigned on the UCC database.
UCC Filing - Click here if you wish to proceed with a new filing under the
same login ID.
Acknowledgement Copy - Click here if you wish to display and print a copy of
the filed document. You must print this copy before leaving your browser
session. Once this connection is gone, you cannot get back to this option.
Generate PDF – Click here if you want to have a PDF version of the Acknowledgement Copy emailed to you.
UCC3 User Manual
User Guide Topics
Login Information
|
|
|
|
|
The Login is required before proceeding. If you are a new user, click below the Continue button (click here link).
Continue – The Continue button here will take you to a new page to enter information for creating a new account or to the Filer page if you have a login.
UCC Type Information
Select UCC3 from the type of Filing drop down list.
Enter a valid UCC1 number in the UCC1 File# field.
Select a Type of Filing from the Filing Type drop down list.
Click the Continue button to navigate to the Filer
Information screen.
Filer Information
|
|
|
|
|
|
|
|
Fill in all required fields.
If you are filing a TERMINATION, CONTINUATION OR ASSIGNMENT the field descriptions listed below are not presented on the screen.
Party Information Change - You may only select 1 option from this field for this
filing.
Amendment Type - You may only select 1 type for this filing.
Real Estate - Click yes if this is to be filed or recorded in the Real Estate
Records.
Continue - Click here when you are ready to proceed with the filing.
Assignee
Information
|
|
|
|
|
|
|
|
New Info - Type in the name and address of the Assignee. Either
an individual or organization name but not both.
New Info - Enter the name of assignor (on the next screen presented).
Collateral - if partial Assignment affects only some (but not all) of the
collateral covered by the identified financing statement, enter affected
collateral in 2nd screen presented.
Save - This button stores the information currently in the fields and proceeds to the next screen.
Continue – This button proceeds to the next screen.
Authorization
Information
|
|
|
|
|
|
|
|
It is required to indicate the name and party authorizing an amendment.
Authorized By - Type in the name of authorized party. If this is an assignment,
enter assignor's name. If this is an Amendment authorized by a Debtor that adds
collateral or adds a Debtor, or if this is a Termination authorized by a
Debtor, click the Debtor box.
Authorized Party Type - Click the appropriate party type authorizing this
Amendment.
Submit - This button stores the information typed and proceeds to the next
screen.
Party
Info
|
|
|
|
|
|
|
|
The Debtor/Secured Party name or address to be changed must be typed in exactly as it appears on the original UCC filing. If the party is to be deleted, only enter the name of the party (exactly as it appears on the original. If a party is being added, type in the name and address and save and proceed. Debtors/ Secured parties can be either a Organization or Individual, type the name in the appropriate field and tab to the address field.
Current Info - Type in the name of the party to be changed or deleted
exactly as it appears on the original UCC1.
New Info - Type in the name and/or the address (if the action is a Change)
exactly as it should appear on the filing.
If the action is Add, type in both the name and address.
Trust - Click this box to indicate the organization is a trust.
Trust Date - If entering a date, you must use format mm/dd/yyyy.
Address - The street address of the party. The first line of the address is
required.
State - This is required.
Zip Code - Enter either a 5 or 9 digit code if the address is within the United
States.
Save - The Save button store the information currently in the fields.
Continue - This button will proceed to the next screen.
Add New – The Add New removes any unsaved entered data and refreshes the screen.
First, Previous, Next, Last – These buttons help users move between debtors in the added grid if more than one debtor is added for the purposes of viewing or editing a debtor.